Tuesday, April 19, 2022

Disable Azure AD Sync and Federated Authentication ( ADFS ) in O365

Applies To : Microsoft Office 365

                    ADFS and AD Sync Tool.


Objective / Scenario :

we want to transfer the custom domain "abc.org" from O365 Tennent "A" to Office 365 Tennent "B".

But, "abc.org" is configured with On-Premise Active Directory and ADFS Authorization tool, moreover, we have deleted the ADFS Server prior to disabling it in O365 Tennent, Due to this Users were not able to authenticate with ADFS.

To Authenticate users, the authentication method must change and make the default "onmicrosoft.com" domain to all users to remove the custom domain from Tennent "A".

The below steps demonstrate how to remove ADFS Federated authentication without ADFS accessibility.


Step 1: Open Window PowerShell with "Administrative" rights.

Step 2 : Install MSOnline Module if not installed already " Install-Module MSOnline "

Step 3 : "Connect - MsolService" and Give Username and Password.

Step 4 : "Get-MsolDomain" command to get the Custom domain and Authentication Methods used.


Step 5 : you can see the Custom domain "abc.org" is using "federated" Authentication.

Step 6 : in this step we will disable ADFS "federated" authentication to "managed". 

    Command : "Set-MsolDomainAuthentication - DomainName abc.com -Authentication Managed"

Step 7 : now check once again with "Get-MsolDomain"  custom domain now converted with "Managed


Step 8: Still you will not able to do modification in users' primary e-mail due to AD Sync, needs to disable AD Sync with O365.

Step 9 : "Set-MsolDirSyncEnabled -EnableDirSync $false" and Confirm "Y"


Step 10 : Wait for 15 to 30 min to reflect changes.

Step 11 : Now you can change All users' Primary E-mail IDs from Custom Domain to Default Onmicrosoft.com domain.

Step 12 : After successfully changing of primary E-mail id then remove Custom Domain and add it to the new Tennent.

Thursday, April 14, 2022

Failed to open mailbox abc@abc.onmicrosoft.com" "failed to access mailbox" " Mailbox does not exist"


Applies to : Veeam Backup for O365, Exchange Server 2013, 2016, 2019

Problem:  Cross Tennent Veeam backup restore error " Failed to open mailbox abc@abc.onmicrosoft.com" "failed to access mailbox" " Mailbox does not exist"

Scenario: I have Two Office 365 Tennent "A" and "B", I want to migrate all mailbox data from Tennent "A" to Tennent "B" ( Cross Tennent Migration ).

I Used the Veeam O365 backup tool to backup of all mailbox,Sharepoint, One Drive data from Tennent "A" and Create Restore Task to Tennent "B".


Diagnose : 

1) Download Backup Logs from Veeam Console. https://helpcenter.veeam.com/docs/vbo365/guide/vbo_exporting_logs.html?ver=60 

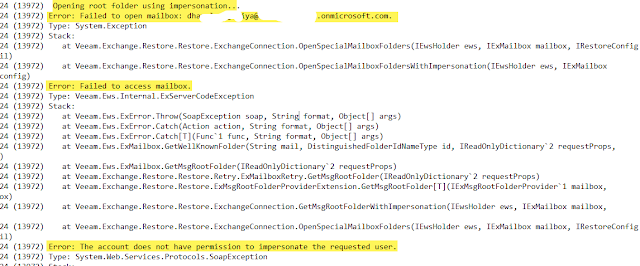
2) Found below error in log file.


Resolution : 

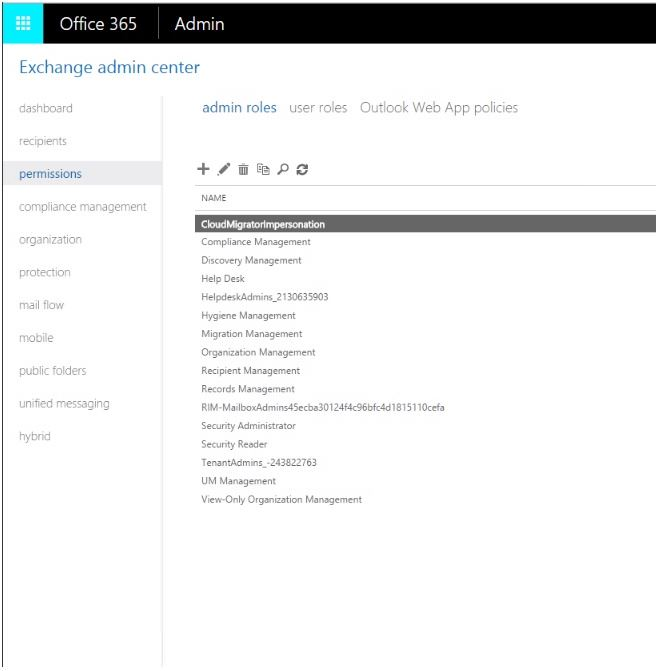
1. Login to the Office 365 Exchange Admin Portal.

2. Go to Permissions, then under Admin Roles click the '+' symbol to add a new role and enter the Name and Description 'CloudMigratorImpersonation'.


3. Click the '+' symbol under 'Roles:', select ApplicationImpersonation, click 'add →' then 'OK'


4. Click the '+' symbol under 'Members:' and select your Admin User, click 'add →' then 'OK'


5. Click 'Save' in the 'Role Group' window and you will then see the Impersonation role listed in Admin Roles. 

You can now use application impersonation with your admin user in CloudMigrator.


Reference : 


Microsoft Exchange Active Sync "HTTP error 500.24 - Internal Server Error" and "An HTTP 500 response was returned from IIS7"

 Applies to  : Microsoft Exchange Server 2016

Problem: Mails on Mobile Devices are not synching, from internal/external networks.

further, diagnose open https://testconnectivity.microsoft.com and got below error " An HTTP 500 response was returned from IIS7"


I tried to access Microsoft Active Sync Virtual directory from web browser "https://example.contoso.com/Microsoft-Server-ActiveSync" and got the below error " HTTP Error 500.24 - Internal Server Error"


RESOLUTION :

1) Open IIS Management console

2) Select, Default Website, and Navigate to the Active Sync virtual directory.

3) Open Advance Settings and Copy Path of the Virtual Directory.

4) Go to the Virtual Directory path and Find "Web.config" file. ( Example Path : %Exchange Server Installation Directory%\ClientAccess\Sync\web.config"

5) Open "web.config" file in Text Editor and Find "impersonate". ( Make Copy of the original file prior to editing )

6) Setup value, impersonate=True to False.

7) Save File and Restart IIS Server.

References : 

https://social.technet.microsoft.com/Forums/en-US/e60ebbf2-f8d2-403f-8d20-aada110bfd72/activesync-problem-http-500-response?forum=exchangesvr3rdpartyappslegacy 

https://helpcenter.gsx.com/hc/en-us/articles/115006225328-Exchange-2010-CAS-Check-ActiveSync-500-Internal-Server-Error

https://www.azure365pro.com/exchange-activesync-returned-an-http-500-response-internal-server-error/

Thursday, January 29, 2015

how to activate Office365

Hi,

Please find Office 365 Activation Process and customer support detail for india.

Please find process to activate Office 365 through the tab Online Service Activation. 
Once you have acquire the OSA key, you may proceed to click below link for your Office 365 activation:
Microsoft Volume Licensing Services Support Center
India: 000800 440 1555 (Toll-Free Number) / 1 (212) 444 0497 (Toll Number)
For more information on Volume Licensing/Software Assurance:
Kindly be informed that Office 365 is a license that gives a user the right to access for Cloud services. Hence you are unable to get any setup or media to download from the VLSC web page.
You may contact our CPC team at 1800 200 2052 for Office 365 configuration and further assistance.

Thank you for your continued support towards Microsoft products and services.

Regards,,
Gaurang Patel

Office 365 Lync Online SRV settings in Plesk DNS Control Panel

Problem:


Office 365 Lync Online SRV Records are not getting verified by Office 365 DNS.

Symptoms :


 Rest of all Records are getting verified without any issue like "CNAME", "MX" , "A" Records, but when you set SRV Records for Lync Online in Plesk DNS control penal it is not allow you to set WEIGHT to "0" and priority to "100"


Resolution :


After so many diagnose I found that removing the _ from the sip and tls setting and setting the priority and weight to 0 allow it to verify.

UNIX or Linux OS servers that host DNS don’t require the underscore (_) when you add SRV records to the DNS host. If your DNS host is running UNIX or Linux and the SRV records aren’t resolving correctly, remove the underscore from the host name of the SRV record.


After setting above value please wait for at least 10 minutes to reflect DNS records changes, it may also depend on your internet speed and DNS Propagation Speed.

now open Office 365 Admin page and change DNS settings, Select Verify domain button to verify DNS changes and hurrayyyyy!!!!! Congratulations you have successfully configured Office 365 DNS records. Now your Lync will be up and running.

hope this may help.

Regards,,
Gaurang Patel


Tuesday, January 13, 2015


Now a Day’s NAS Storage is very Popular in SMB and MSMB Market for various Use case like File Sharing , Disaster Recovery , Virtualization and most importantly Backup to Disk.

Netgear Ready NAS Provides in-build Backup software where you can create Backup jobs directly and initiate backup on NAS, however it is also provide RSYNC Protocol and Netgear Replication over the wan which can take backup of your NAS to another NAS in any corner of the world, you just need is an Internet Connection and most important without any Internet LIVE IP.

However Replication has some Pros and Cons, it is maintaining Backup revision on All Backup Data which is more convenient at the time of actual restoration of data and sometime Backup job fails because of PPP session initiation failed from remote end.

By the Help of RSYNC replication technology you can replicate Primary NAS Data to DR NAS with Actual Data Format with More accuracy but you need Live IP address on Primary location is preferred, it would be great if you have Live IP on both end.

Here I am going to make an exact replica of primary NAS (DATA only) to DR Location NAS, so I am going to use Live IP address on Primary location and use dynamic IP address on DR end.

To implement this scenario on your network please follow below steps.

HO Side :

·         Create Users and Groups Locally or Synchronise with Active Directory.
·         Design Folder Structure as per your need and give appropriate Permission.
·         Enable RSYNC on all Folders which you want to Replicate / Synchronize.
·         Add host and User for Additional RSYNC Security.
·         Take System Configuration backup of “Share Access” , “ Users and Groups” , “Services” and store to appropriate location. ( do not store on NAS )

DR Side :

·         Manually Create identical Folders same as HO Side ( double check the spelling and white space, advisable to copy Name )
·         Create RSYNC Backup jobs for all respective folders which you want to replicate.
·         Schedule backup frequency as per your environment.

Restoration Process :

·         Restore NAS 1 Configuration backup on DR NAS which will restore File and Folder backup permission as well as users and groups.
·         Move DR NAS to HO side and Rotate IP Address.
That’s IT…… within minimum hours your environment will be up and running.


Network Connectivity Diagram.


1   1) Open Admin Console -> Go to Accounts Tab. Create Local Users and Groups.


     2)   In case of Active Directory Domain Scenario Go to Accounts - > Authentication. Account Type = Active Directory. NetBIOS Domain Name = example. FQDN = example.com. Container OU= left blank for all OU or specify user Define OU. Include Trusted Domain = Yes / No ( for AD Trusted domain Authentication ) Administrator Name = Administrator Users name. Administrator password = < user password > Directory Server Address = IP address or host name. Do not Cache ADS accounts locally = yes / no ( once you enable this option it will go to active directory server each and every time )


Thursday, November 20, 2014

Exchange 2013 Outlook and OWA Search Does Not Work

Exchange 2013 Outlook and OWA Search Does Not Work

As with all previous versions of OWA, Exchange 2013 has a search function that is above the mail column as seen below.
Exchange 2013 owa search
I came across an issue recently where if you did a search in OWA 2013, no results would be show, no matter what information I used as the search keywords. No matter what no search results where found. In Exchange 2013 , the search index is stored with the Mailbox store where the users are located. To resolve this issue and build the OWA 2013  and the Exchange search index again we needed to do the following. This error may also occur withOutlook clients that are not in cached mode.
1) Stop Service
 navigate to services stop the Microsoft Exchange Search Microsoft Exchange Search Host Controller service.
2) Locate User Mailbox Database.
Once done locate the folder on your server where the Mailbox database is where the user is trying  to search from. For example mine is here.
C:\Program Files >Microsoft > Exchange Server > V15 > Mailbox > Mailbox Database 1403936621

Exchange 2013 Search database
If you are unsure where the the mailbox database is use the command below from power-shell.

Get-MailboxDatabase "yourmailboxdatabase" |fl name,*path*
Once the path is located you will find a folder name with a long “GUID” and the word Single on the end.
exchange 2013 search guid
3) Rename this folder .old.
We then need to start the Microsoft Exchange Search service again, The server will now begin to rebuild its search index.
Give it plenty of time to rebuild then issue the command below and make sure the status of Content Index Status is seen as healthy.
Get-MailboxDatabaseCopyStatus
As seen below, if it says healthy try your search and you should see that your search results now appear in Outlook and OWA 2013.
Exchange 2013 rebuild search index