Hello Friends,
i will show you how to setup Microsoft Exchange 2013 server, First of all i would like to show you the Compatibility matrix of MS Exchange 2013 as mentioned below.
Note: Once you install / Prepare AD for MS Exchange 2013 you won't be able to install MS Exchange 2010 or later version.
Note: Once you install / Prepare AD for MS Exchange 2013 you won't be able to install MS Exchange 2010 or later version.
Operating System Requirement:
Operating system
- Windows Server 2012
- Windows Server 2008 R2 Standard with SP1
- Windows Server 2008 R2 Enterprise with SP1
- Windows Server 2008 R2 Datacenter RTM or later
Operating system
for Management Tools (on a computer with 64bit processor)
- Windows Server 2012
- Windows Server 2008 R2 Standard with SP1
- Windows Server 2008 R2 Enterprise with SP1
- Windows Server 2008 R2 Datacenter RTM or later
- 64-bit edition of Windows 8 Release Preview
- 64-bit edition of Windows 7 with SP1
Active Directory Server
Requirement:
Schema Master
In each Active Directory site
where you plan to install Exchange 2013 Preview, you must have at least one
writable domain controller running any of the following:
- Windows Server 2012
- Windows Server 2008 R2 Standard or Enterprise SP1 or later
- Windows Server 2008 R2 Datacenter RTM or later
- Windows Server 2008 Standard or Enterprise SP1 or later (32-bit or 64-bit)
- Windows Server 2008 Datacenter RTM or later
Schema Master
- Windows Server 2012
- Windows Server 2008 R2 Standard or Enterprise
- Windows Server 2008 Standard or Enterprise (32-bit or 64-bit)
- Windows Server 2003 Standard Edition with Service Pack 2 (SP2) or later (32-bit or 64-bit)
- Windows Server 2003 Enterprise Edition with SP2 or later (32-bit or 64-bit)
Global Catalog
Server
At least one Global Catalog
server in every Active Directory site where you are planning to install
Exchange Server 2013 Preview on,
- Windows Server 2012
- Windows Server 2008 R2 Standard or Enterprise
- Windows Server 2008 R2 Datacenter RTM or later
- Windows Server 2008 Standard or Enterprise (32-bit or 64-bit)
- Windows Server 2008 Datacenter RTM or later
Active Directory
Forest
- Active Directory must be at Windows Server 2003 forest functionality mode or higher.
Prerequisites for Windows
2008 R2 SP1:
Required Windows roles and
features
- Open Powershell (Open Powershell window with elevated
rights by right-clicking it "Run as Administrator") and import
server module first with "Import-Module ServerManager"
command then install/enable Operating System components as per below;
Client Access and Mailbox role
Import-Module ServerManager
Add-WindowsFeature Desktop-Experience, NET-Framework, NET-HTTP-Activation, RPC-over-HTTP-proxy, RSAT-Clustering, RSAT-Web-Server, WAS-Process-Model, Web-Asp-Net, Web-Basic-Auth, Web-Client-Auth, Web-Digest-Auth, Web-Dir-Browsing, Web-Dyn-Compression, Web-Http-Errors, Web-Http-Logging, Web-Http-Redirect, Web-Http-Tracing, Web-ISAPI-Ext, Web-ISAPI-Filter, Web-Lgcy-Mgmt-Console, Web-Metabase, Web-Mgmt-Console, Web-Mgmt-Service, Web-Net-Ext, Web-Request-Monitor, Web-Server, Web-Stat-Compression, Web-Static-Content, Web-Windows-Auth, Web-WMI
Required Software
- Microsoft .NET Framework 4.5 RC
- Windows Management Framework 3.0
- Microsoft Unified Communications Managed API 4.0, Core Runtime 64-bit
- Microsoft Office 2010 Filter Pack 64 bit
- Microsoft Office 2010 Filter Pack SP1 64 bit
- Microsoft Knowledge Base article KB974405 (Windows Identity Foundation)
- KB2619234 (Enable the Association Cookie/GUID that is used by RPC over HTTP to also be used at the RPC layer in Windows 7 and in Windows Server 2008 R2)
- KB2533623 (Insecure library loading could allow remote code execution)
Uninstall Microsoft Visual
C++ 11 Beta Redistributable (x64)
(Control Panel -> Programs and Features -> Uninstall)
(Control Panel -> Programs and Features -> Uninstall)
Register ASP.NET with .NET
Framework 4.5 in Internet Information Services (IIS)
Open CMD
Run this command:
%SystemDrive%\Windows\Microsoft.NET\Framework64\v4.0.30319\aspnet_regiis.exe -ir -enable
Open CMD
Run this command:
%SystemDrive%\Windows\Microsoft.NET\Framework64\v4.0.30319\aspnet_regiis.exe -ir -enable
Restart the IIS services:
IISReset
Windows Server 2012
prerequisites
- Open Powershell (Open Powershell window with elevated
rights by right-clicking it "Run as Administrator") and import
server module first with "Import-Module ServerManager"
command then install/enable Operating System components as per below;
Client Access and Mailbox role
Import-Module ServerManager
Install-WindowsFeature AS-HTTP-Activation, Desktop-Experience, NET-Framework-45-Features, RPC-over-HTTP-proxy, RSAT-Clustering, Web-Mgmt-Console, WAS-Process-Model, Web-Asp-Net45, Web-Basic-Auth, Web-Client-Auth, Web-Digest-Auth, Web-Dir-Browsing, Web-Dyn-Compression, Web-Http-Errors, Web-Http-Logging, Web-Http-Redirect, Web-Http-Tracing, Web-ISAPI-Ext, Web-ISAPI-Filter, Web-Lgcy-Mgmt-Console, Web-Metabase, Web-Mgmt-Console, Web-Mgmt-Service, Web-Net-Ext45, Web-Request-Monitor, Web-Server, Web-Stat-Compression, Web-Static-Content, Web-Windows-Auth, Web-WMI, Windows-Identity-Foundation
Required Software
- Microsoft Unified Communications Managed API 4.0, Core Runtime 64-bit
- Microsoft Office 2010 Filter Pack 64 bit
- Microsoft Office 2010 Filter Pack SP1 64 bit
Uninstall Microsoft Visual
C++ 11 Beta Redistributable (x64)
(Control Panel -> Programs and Features -> Uninstall)
(Control Panel -> Programs and Features -> Uninstall)
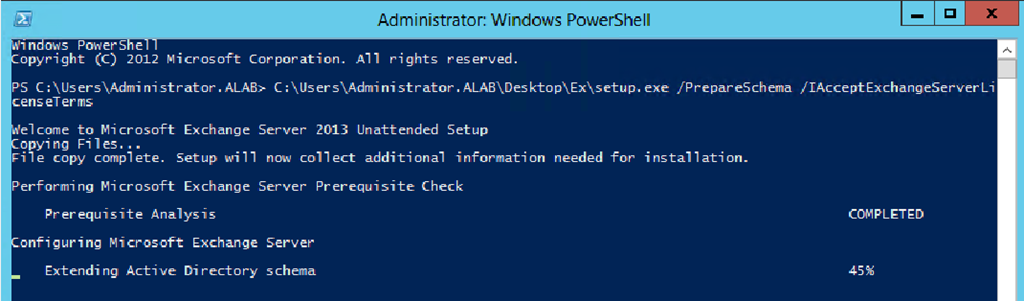
Prepare Schema and AD
Prepare the Active Directory Schema to install Exchange
Server 2013 (basically this will extend the schema). You will have to insert
the Exchange Server 2013 RTM DVD (Media Kit)
– Assumption, DVD ROM drive letter is D:\ and
Exchange Server Installation Setup path is D:\Setup.exe –
- Open PowerShell or CMD in admin mode
D:\Setup.exe /PrepareSchema
/IAcceptExchangeServerLicenseTerms
Or
D:\Setup.exe /PS /IAcceptExchangeServerLicenseTerms
- Now that the Schema is being prepared, we will have to move on to the next step and prepare the Active Directory Topolgy.
Before you run this command you should have your Exchange
Server 2013 Organization name
D:\Setup.exe /PrepareAD /OrganizationName:<name>
/IAcceptExchangeServerLicenseTerms
Or
D:\Setup.exe /PAD /OrganizationName:<name>
/IAcceptExchangeServerLicenseTerms
Now that the Schema and the AD are prepared,
Run the Exchange Server Setup from the DVD (Run as
Administrator)


It will request to check for updates, select Connect to the
internet and check for updates and click next
necessary updates will be downloaded , in my case there was
no updates
Files are being copied to install Exchange Server 2013
Initializing the Exchange Server 2013 Setup
Gives
and Introduction to the Exchange Server 2013, upon reading click next
Accept the License Agreement (you are supposed to read this)
and click next
I will have left the default setting of selecting the “Use
Recommended Settings” option and click next
The Server roles that are to be installed select and click
next. Notice that Exchange Server 2013 does not contain all the server roles
that were introduced in Exchange 2007 and 2010. It has been reduced to 2 now
(to read more click here)
The path of the installation and the required space for the
installation. click next upon making the changes
Malware Protection Settings – I am leaving it on – default
setting and click next
Readiness check – whether your server is ready for Exchange
2013, click install once done
Installation begins and it has 14 steps. It will take some
time
Setup completion, read and click finish.
Exchange Server 2013 program shortcuts on Windows Server
2012. Note that the Exchange Management Console (EMC) is no where to be seen.
This is because the traditional EMC is being moved to a web interface
Log in page for the Web Based Exchange Admin center
(Equivalent to EMC). login using your admin credentials
Log in to the Exchange
Control Panel.
https://<Exchange
Server FQDN/IP>/ecp
https://localhost/ecp
https://localhost/ecp
No comments:
Post a Comment